Monday, May 11, 2015

Graduation Gap


I started by laying out the design I wanted before gluing anything down. Be sure to double and triple check that the cap is facing the right direction!! I hot glued the flowers to a small square of paper then hot glued the paper to the cap.
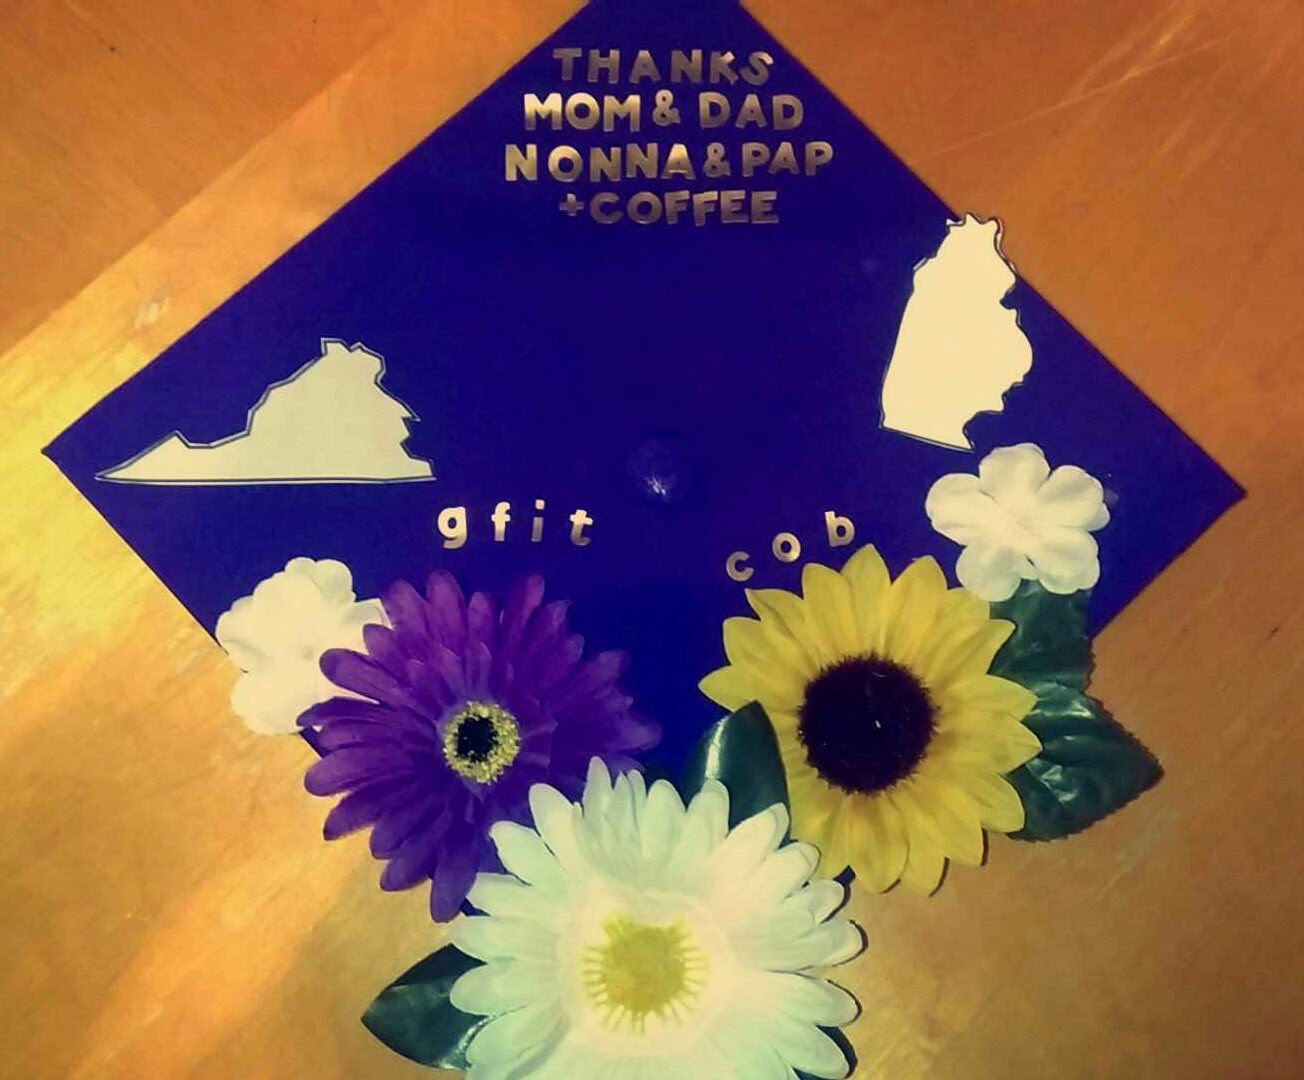
I used gold stickers to match the purple and gold theme. I printed out the shape of the states so I could align the text properly. For the final copy, I traced the outline of the states on heavier cardstock and used a glue stick to hold them down. I wouldn't advise using the glue stick as it doesn't hold as well as the hot glue does. 

Ta-da! My finished cap! The states represent moving from my home in Virginia to Illinois. GFIT and COB represent my affiliations with Group Fitness and the College of Business, which occupied most of my undergrad time. 


Sunday, April 19, 2015

Graduation Preperation

T-minus two weeks until graduation! 
In front of Wilson Hall, the main building on the quad.

I am so excited and have been working hard to get everything put together before May 8th. From buying my cap, cords, and gown to getting my senior portraits done all while balancing final exams and papers. I wanted to take a break and post some pictures to share with you all!


Used this shot to make my announcements on Shutterfly.com

Used flowers from the craft store and gold stickers to decorate my cap
"THANKS
MOM & DAD
NONNA & PAP
AND COFFEE"

Saturday, April 4, 2015

Green Goddess Shake


I have been using this shake recipe for over two years now and still love it. I was surprised how sweet yet tangy the result is. The banana, honey, and vanilla give it a sweet taste that overrides the spinach and avocado. The lemon gives it the kick needed to give it that refreshing taste.

Mix all the ingredients with ice. You need a powerful blender to smoothly blend the lemon rinds and spinach. I don't usually have to add any liquid as the vanilla and lemon juice provide enough. Enjoy!

My sister and I drinking this shake. Summer, 2013 


Sunday, March 29, 2015

Best "Frosting" Recipe You'll Ever Use

WOW! I can hardly believe it's almost April already. I graduate in less than two months and I have been busy job searching, studying, and working. In celebration of purchasing my own domain name for my blog, I am posting one of my favorite frosting recipes for the perfect light and moist cakes. I used this exact recipe over spring break to make a strawberry cheesecake marble cake. I used boxed marble cake mix and used cheesecake pudding to give the frosting a cheesecake taste.

Directions:
Prepare cake as instructed and let cool.
Mix 1 cup cold milk with pudding mix,
Stir well until mix begins to thicken.
Pour mix into cool whip and gently stir together.
Spread over room temperature cake and refrigerate.


The frosting holds its shape extremely well and does not run. It is a little more difficult to get a perfectly smooth spread, so this is not the icing to use if that is the result you are going for. I also used this frosting on a hummingbird cake I made. Check it out here! 

Happy Frosting!


Wednesday, November 26, 2014

DIY Upcycle Chalkboard Frame


Happy Thanksgiving!

DIY Upcycle Chalkboard Frame Monkey See Monkey DIY
I am so happy to be on Thanksgiving break and finally have time to relax with friends and family. I made these chalkboard frames as gifts for Thanksgiving. These upcycled frames came from Goodwill and all three cost under $3. The chalkboard paint can be purchased at any craft store (I bought mine at Michael’s) and I used acrylic paint for the wooden frames. I painted the chalkboard paint over the glass frame and let dry 24 hours before putting on a second coat. I waited another 24 hours to decorate the chalkboard. Check this tutorial by MonkeySeeMonkeyDIY on image transferring to recreate the perfect text or picture every time!

DIY Upcycle Chalkboard Frame

DIY Upcycle Chalkboard Frame

DIY Upcycle Chalkboard Frame

DIY Upcycle Chalkboard Frame


DIY Upcycle Chalkboard Frame